Saturday 30 April 2011

April Moodboard - And the winner is...

Good morning beaders! Thanks to everyone who joined in with our April moodboard challenge, I always enjoy seeing everyone's gorgeous creations and this month's collection of beady goodness is no exception! Before I announce the winner lets have another look at the mosaic I posted for your inspiration...


And here's what was made by our lovely readers and blog team...

Clockwise from top-left: Peppermint Dream Ornament, I have a bag that's cool, Diamond Wall Pattern, Swap packages.


Eva


Carol


Lesley


Sarah


Mandy


Catherine


Me


Clair (who almost finished her lovely project!)


Dee


This month I'm using Random.org to randomize the list of names and the beader who's name is at the top is...


...Catherine!


Congratulations Catherine, Sarah will be in touch with you about your prize shortly :)

Thanks again to everyone who joined in and thanks also to everyone who takes the time to visit and follow our blog. Don't forget to check back tomorrow when I'll be posting a brand new moodboard for May!

Free Pattern - Diamond Lines Peyote Bracelet

You may recognise this pattern as I designed for my entry in this month's Moodboard Challenge. I thought that you may enjoy it too. It is odd count peyote, although you could use even count, leaving off the last bead in each row and brick stitch them on at the end. Happy beading!

Sarahx

Wednesday 27 April 2011

Wednesday Review - Beading Supply Sites

Sorry i am a little late in getting this review out to you, but i was having a very big dilemma about what/who to review. I have a mountain of books and magazines, but i thought to myself to do something different so here we go....

This weeks Review will be on Beading Supplies and where to get them from ;o) We all love to buy beads and I thought it would be nice to share sites i have collected over the years.

I will start with...
Crystals & Ice  www.crystals-and-ice.co.uk
Jenny & James have a wide variety of supplies at good prices. They are fast at posting out your items too (which we all know is very important lol) I always buy my findings here, their headpins / eyepins and ball spacers are a must for any project where you don't want the plating to tarnish quickly. I am very sensitive to most plated metals, but the quality of these ones are brill, even I can wear the ear wires.
So why not check them out and see if you find them as good as I do ;o)

The Second Shop on my list is...
Jencel  www.jencel.co.uk
Celia is such a lovely lady, and she also has very good prices on her supplies. I buy a lot of my 3mm & 4mm Faceted Czech Glass Beads from her, and thread and I just love her 'Silvered Glass' Ovals! Celia's website is full of eye candy and it is very hard to stop clicking the 'buy' button! Fast postage with her too, normally within a couple of days (if the postal service is working properly) lol. Keep up the great work Celia!!

The Third Shop is...
Debbie at Beadservice www.beadservice.co.uk
Debbie also has an array of goodies from beads to findings. Debbie does lovely mixes of seed beads too in various sizes at very good prices.

The Fourth Shop is....
Lynn Firth at Stitch and Craft www.stitchncraft.co.uk
Cor could I do some serious credit card damage if i lived near her shop! I spend enough when their stall is at the bead fairs I attend! The hardest part is choosing colours! If you need seed beads and thread you need to buy it all with them. They sell all sorts from beading thread to seed beads to needles to ummm everything!!! Mmmm..... Heaven lol.

The Fifth Shop is...
Caron at www.noseksjustgems.com
The one stop shop if you need Swarovski Crystals at a good price! I buy in bulk from her, and also again very good at fast delivery. Caron has a lovely selection of tiara blanks too ;o)

The Sixth Shop is....
thesouthamptonbeadshop.co.uk
I found out about this company when i went to the chepstow bead fair earlier this year. I like the range of seedbeads they supply, and they also have a lot of tantalising treats in their webshop.

Oh well, i think that is enough eye candy for you to be going on with. There are far too many fablous items in each of these shops for me to put here, so just go have a browse for yourselves and I wish your bank balance luck ;o)

I hope you have enjoyed this review, and I have not bored you to tears. Don't worry Sarah will be back next week with a sensible one hehehe.

Happy Buying & Beading Blog Followers. Ciao for now.

Carol XXX

Monday 25 April 2011

April Moodboard

Another submission to our black, white and red challenge to share with you this week, a beautiful red and black cuff from Catherine...


Thanks for joining in with us Catherine!

If you'd like to play along with us this month and be in with a chance to win one of these gorgeous Spring Blossom kits from Sarah, please see the original post here.

Saturday 23 April 2011

Basic Stitch Tutorial - Spiral Rope

Another of my favourites and a very popular stitch among beaders is spiral rope. Also known as spiral rope chain, spiral staircase or spiral stitch, it is very versatile and you can make it as simple or as embellished as you like.

There are two sets of beads in spiral rope, the core beads and the outer beads. The core beads run through the centre of the rope, these are usually the same colour and size throughout. The outer beads spiral around the core beads and can be one colour and bead type or a combination of several. You can achieve a multitude of different effects simply by changing the combination of colours, sizes and types of beads you use.

For this tutorial I'm making a very simple rope using size 11 seed beads with 3 outer beads over 4 core beads.

1. With a comfortable length of thread, pick up 4 core beads and three outer beads. Slide them down the thread leaving a tail of about 8-10".


2. Sew through the 4 core beads once more, in the same direction.


3. Position the beads so that the outer beads are on the left.


4. Pick up 1 core bead and three outer beads. Keeping the first set of outer beads pushed to the left, sew through the top 3 core beads.


5. Sew through the single core bead that you just added before pulling the thread snug.


Repeat steps 4 and 5 until the rope is as long as you need, pushing the outer beads to the left each time.


Note: You can push the outer beads to the right if your prefer, just make sure you push them all in the same direction throughout the rope.

Here are a few finished ropes in various colours...


I hope you've enjoyed this tutorial, please leave a comment if you have any questions or tips you'd like to share!

Wednesday 20 April 2011

Magazine Review - Beads & Beyond May 2011


Beads and Beyond is a British based monthly magazine. I don't get it every month as there aren't that many seed bead projects, but when I do I am always impressed with the design, format and layout which is very fresh, modern and clean and makes this magazine a real pleasure to flick through. This issue has 14 featured projects including stringing, lampwork, wirework and one seed bead piece. There are also features on jewellery makers, 15 lariats in purple and lime and the designer challenge projects.


Of the projects my favourite is the seed bead necklace (no surprises there!), which is a beautiful blue floral pendant with a fringed strap. There are some particularly beautiful wire work projects in this issue, the treasures of the sea projects are inspired by nautilus shells and are just stunning, also there is a wirework fossil pendant which I love and want to try making for myself. There is a very fashion led necklace called Anchors Away which includes stringing, wirework and a bit of sewing that would be perfect for this years nautical fashions, I really liked this one! The lampworked goldstone nuggets are also beautiful, though it's not a craft I practise, my husband has banned me from anything that involves a torch!


If you are interested in the nautical trend, there is a round up of beads and charms, including some fabulous swarovski fish crystal beads that I really want to own. There are lots of giveaways in this magazine too.


While this magazine will probably never be my absolute favourite, simply because there aren't enough seed projects for me, this magazine is a lovely general jewellery making magazine with some beautiful on trend projects. It's lovely to flick through and the photography is inspiring, so definitely worth a look!


Happy beading!

Sarahx


Monday 18 April 2011

April Moodboard

Three gorgeous submissions to the April Moodboard challenge to share with you this week!

Sarah made this diamond patterned bracelet using peyote stitch...


Lesley made this sparkly choker in right angle weave...


And Mandy made this russian rope bracelet...


If you'd like to join in with us this month and be in with a chance to win one of Sarah's fab Spring Blossom kits, please see the original post here. And don't forget, your submission doesn't have to be beadwoven, you can use any kind of beading technique, all are welcome!

Saturday 16 April 2011

Refelctions Bracelet Tutorial

Ok, so I liked Sarah's tutorial so much i wanted to give it a go. Only problem I had was that i didn't have a swarovski ring. Typical eh?

So i thought i would adapt the design and make my own version, so here it is. A Spinner Style Bracelet.


Carol XXX

Reflections Bracelet Tutorial


This weeks tutorial is for this super simple but pretty Swarovski Ring and cord bracelet. I've had the ring for a couple of years and really wanted to bust it out of my stash as it's far too lovely to languish in a box unused.

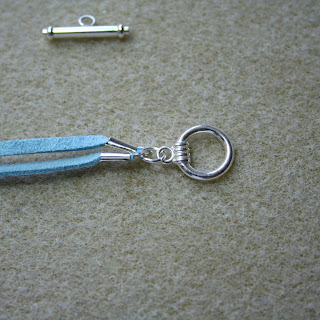
Materials required: 1 x Swarovski Crystal Ring, 2 x 8 inches (or length to fit your wrist) 2mm wide faux suede cord, 4 x cords ends (to fit 2mm), 2 x open jump rings, 1 x toggle clasp. 1. Place one end of your cord inside the cord end and, using flat nose pliers, close the cord end over the cord.


2. Repeat until all ends of the cord have a connector.


3. Fold one length of cord in half and pass the folded end through the Swarovski ring.


4. Take the two cord ends and pass them between the ring and the folded end of the cord.


5. Pull snug and repeat steps 3- 5 on the other side.


6. Using round nosed pliers, open a jump ring and thread it through the holes in the cord ends on one side of the bracelet.


7. Thread the jump ring through one part of the toggle clasp and close. Repeat steps 6 & 7 on the other side.


Happy Beading!


Sarahx

Wednesday 13 April 2011

Podcast Review - Bead Circle Episode 2

As well as beading, I also knit and have long been a fan of knitting podcasts. So I was very excited to discover that Mandi Ainsworth from the Bead Circle Network http://beadcircle.com/ has launched a beading podcast and thought I would do a quick review of it for anyone who has not found it yet. I'm not going to go to in depth as I don't want to give away too many spoilers.


So far there are only 2 episodes, the 1st episode was published on the 26th February and is a very interesting interview with Nancy Zellers http://beadcircle.com/2011/02/bcp-01-nancy-zellers/. Episode 2 http://beadcircle.com/2011/04/bcp-02-talking-with-the-lone-beader%c2%ae/is an interview with Diana Grygo aka The Lone Beader http://blog.thelonebeader.com/.


Mandi starts off the podcast talking about the beading by the Bay Retreat, which sounds fabulous and then goes into the interview. Diana talks about how she got started in beading and bead embroidery and talks in more detail about some of her pieces such as The Diva's and The Time Traveller's series. They also talk about how to find and enter your beaded art in appropriate juried shows. They touch on registering your name as a trademark, which was unexpected but interesting, although the laws and regulations are most likely different on this side of the pond. Diana also gives a bit of information about her tutorial on bead embroidery, which is available in her Etsy store http://www.etsy.com/shop/thelonebeader?ref=pr_shop.


I found the podcast very enjoyable to listen to, Mandi asks great questions that resulted in a fun interview and Diana's enthusiasm for her work shines through, it's definitely worth a listen if you are a bead enthusiast!


Happy beading!


Sarahx

Monday 11 April 2011

April Moodboard

Two more submissions for our April Moodboard to show you this week!

Carol has made this gorgeous pendant...


And Lesley has made this wonderful gothic style ring...


If you'd like to join in with us this month and create something for April's black, white and red moodboard, please see the original post for details.

Wednesday 6 April 2011

Magazine Review - Bead and Button Issue 102 (April)


Bead and Button will need no introduction to most beaders, I know. However, I picked up my copy at the weekend and thought I would review it for those people who do not buy it on a regular basis. B&B has a special place in my heart as it is the first magazine I ever bought and is largely responsible for my obsession with beadweaving. Over the years, I have made quite a few projects from this magazine and learnt a lot from it. Some of the issues have had very few pieces that appealed to me, but that is just a matter of taste and after all the magazine does need to appeal to many different tastes and styles. This issue has 17 projects and also included a free booklet with 6 bracelet projects. As I expected, the main focus is on beadweaving techniques (hooray!) but also includes other techniques such as stringing, wirework and metal clay. You can have a look at the contents page here http://www.beadandbutton.com/Magazine/Current%20Issue.aspx


There are some lovely projects in this issue, a couple of which I think I will actually make! First on my list is Cathy Lampole's Daisy Spiral, a lovely colourful spiral necklace featuring tubular netting, beaded beads and heavy weight chain, I think it will be lots of fun to both wear and make. My 2nd favourite is the beautiful trillium ornament by Diane Hertzler which I think I may make for my mums 60th birthday later this year, I rarely make non-jewellery beaded items but this one is really special! The cover bangle by Cynthia Rutledge is also gorgeous and may well end up around my wrist at some point! There are lots of other lovely seed bead projects to choose from too. I also want to mention the Chic & Easy stringing project as it is a great one for beginners to start with and would also be a good stashbuster for us ottbs'ers!


As well as the beautiful projects there are also some nice features and I particularly enjoyed Robin Atkin's article on Transylvanian beadwork traditions, it is well worth a read. I was really pleased with this issue, I liked a lot of the projects and enjoyed reading the features, the FMG advert is also well worth a look as always!


Happy beading!


Sarahx

Monday 4 April 2011

April Moodboard

Here we have our very first submission for the April Moodboard. Eva has created this beautiful necklace using used red magnesite nuggets, red round corals and black agate and onyx. Thank you very much for joining in with us Eva!


If you're up for a challenge and want to be in with a chance to win Sarah's gorgeous kit then please see the original post for details of how to join in with us this month.

Saturday 2 April 2011

Basic Stitch Tutorial - Peyote

Welcome to the first of our basic stitch tutorials! In this series of tutorials we'll be showing you the basics of different stitches and techniques, building up a collection of tutorials that you can refer to whenever you need them. Because you can do so much with the basic stitches once you've learnt them we won’t be including instructions for finishing or embellishing.

We’re beginning the series with peyote stitch, a very versatile technique which is well worth adding to any beaders repertoire. In this tutorial I’m using size 8 Japanese seed beads to create a strip of peyote 6 beads wide. This is a quick and easy way to learn peyote as you only need to add 3 beads per row and the bead size means it works up quickly. I’m also using C-lon beading thread and a size 10 beading needle.

Before you start, thread your needle with a comfortable length of thread. Pick up a stop bead, move it down to about 8" from the end of the thread and sew through it again in the same direction, being careful not to split the thread. The stop bead is a single bead in a contrast colour, it stops your beads falling off and helps you to achieve a better tension when you work the first few rows.

You may find it easier to work the first few rows on a flat surface.

Pick up 6 beads and slide them down to the stop bead.


Pick up 1 bead, skip the first bead on the row and sew through the second bead.


Pick up 1 bead, skip a bead on the row and sew through the next bead.


Pick up 1 bead, skip a bead and sew through the final bead to complete the row. Pull the thread taut to line up the beads.


You’ve just completed 3 rows of peyote (the 6 beads you picked up at the start count as rows 1 and 2) and now have a small strip that has ‘up beads’.

Onto row 4...

Pick up 1 bead and sew through the first ‘up bead’.


Pick up 1 bead and sew through the second ‘up bead’.


Pick up 1 bead and sew through the final ‘up bead’.


Continue picking up 1 bead and sewing through the ‘up beads’, adding 3 beads per row until the strip is as long as you need. You can change the direction that you sew or you might find it easier to flip the strip over after every row. Make sure you keep the thread taut as you work.


Here’s a bracelet I made with the above instructions, using a 'Salt & Pepper' Miyuki bead mix.


I hope you've enjoyed this tutorial, if you have any questions then please ask away!